


DARKROOM: UNIT 26
- Jake Scott Rigby
- Mar 29, 2019
- 10 min read
Updated: Jun 7, 2019
P H O T O G R A P H I C D A R K R O O M :
H I S T O R Y O F T H E D A R K R O O M


The word camera obscura originates Latin, meaning dark room. The darkroom was brought into the industry by a man named Leonardo Da Vinci in the 14th century. A darkroom is a workshop used by photographers all around the world that are using photographic film. It is a room that is kept in complete darkness, or used with red lining lights so it doesn't effect the photographic papers and ruin the method of printing the images. It has to be kept dark because all of the materials that are used within the dark room are all light sensitive materials. In most darkrooms you will find a numerous amount of equipment, such things as an enlarger, slide projector ( optical apparatus ), this projects light through the image onto a negative piece of paper so the image prints on, this is also where you control how much light you want to go through, so it depends on how you are wanting the image to turn out. A sheet of photographic paper is exposed on to by this, which the image is printed on to. When the negative image is exposed through the enlarger it would of printed a positive image through onto the photographic paper.
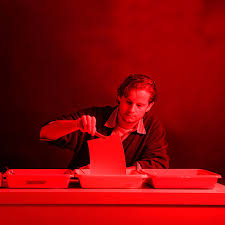
In the dark room, you should happen to find a red light that glows the whole room, this is called a safelight, its a light so you are able to see what you're doing whilst developing your prints. Photographic paper would get exposed if it is used near a blue/green light but its safe to use a red light in the darkroom around photographic paper.
To load your film in and out of your film camera, in the dark room you will find development spools, also known as film holders. When using this you need to be in complete darkness otherwise the film will be exposed.


ENLARGER SAFE LIGHT FILM HOLDER
P R I N T I N G I N T H E D A R K R O O M
If you reduce the light from the enlarger onto the exposure paper, blocking light to the paper is called ''dodging'' or ''burning'' is where you give more exposure to a certain part or when blocking light from the rest of the paper. When printing in the dark room you have to place your film through the enlarger and figure out how much time you are going to let the image set through onto the photographic paper. Once you have estimated and done trials with how long you should expose your image, you place your photographic paper under the enlarger lamp. (Your images off your contact sheet). Once your paper has been exposed you need to move on to develop your image further, so all you do is place your image in the photographic developer, then put it in the stop bath, this is where and then you put it in the photographic fixer to help the image stay at a good tone and to stop further development. You then just put the paper in photographic washer to get rid of all of the chemicals from the photographic processor, you then put your image out to dry. You can take your development further by toning and saturating your image but this is just the standard way of developing images in the dark room.


P H O T O G R A P H E R R E S E A R C H
Richard Avedon


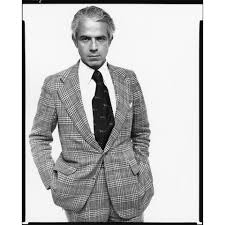
Born in New York City, 1923, May the 15th. He was a fashion and portraiture photographer. New York times stated that his fashion photography "helped america find their style, beauty and culture for over half a century". His photography career kicked off by helping department stores with their advertisement throughout New York. He started working for the bazaar magazine, he started off with the junior magazines and then moved on to the Harper's Bazaar Magazine. He eventually moved on as a staff photographer for Vogue Magazine in 1962. By 1973 he was doing Vogues magazines covers for them until Ann Wintor became chief editor in late 1988. He has done fashion shoots for big brands such as Versace, he has dealt with big names in the industry and working with well known models as well. These are some of his images that have been printed in the dark room.
SID KAPLAN


Sid Kaplan, genuinely known as the go to guy for printing photography. So many famous people, musicians want to work with him, but he is known to only few people outside of the industry. He started off by being a high school photography teacher who taught in the darkroom at a school of visual arts in New York. He made many people become successful and well known, his printing and teaching photography of New York and surrounding areas. He is a very well known and respected photographic printer.
M E D I U M F O R M A T C A M E R A P H O T O G R A P H Y

MEDIUM FORMAT CAMERA
A medium format camera, is still a great method of using film photography, a lot of photographers use a medium format camera for landscape shots.
Medium format cameras are used for film printing in the dark room, its just a bigger film camera, and a lot more harder to use than a regular film Pentax K100. The images I took on this camera are all based in Southport town and around the area. I have been in the darkroom and printed all the images from using this camera, I got all my prints processed but I got them all developed at different times because I wanted to have a mess around with the exposure in the dark room.


3 SECONDS 4 SECONDS 6 SECONDS
These are all of my final outcomes from using a medium format camera.I processed all of these images in the dark room, I attempted to try each of them with different times being limited to develop by the light, so as you can see I started off with 3 seconds, continued to 4 seconds and then attempted 6 seconds, I personally feel as if the 4 second image was the best attempt that I got. I am really happy with how all of these images ended up turning out.
S I L V E R - D R I P P H O T O G R A P H Y
THE WORK OF: TIMOTHY PAKRON
EXAMPLES FOUND ON GOOGLE: https://www.google.com/images/silverdrip/photographyTIMOTHY
PAKRON BLOG: http://www.mississippivegan.com/about-me


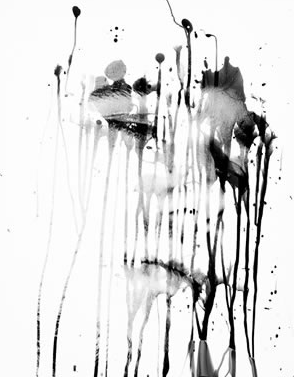
This is an image of Timothy Pakron, Pakron was a fine artist who was born in South Carolina (Mississippi) and lived there as well as New York, he is known truly by how well of a cook he was, a fine artist and a photographer.
His work for photography is based upon him loosing a close friend of his, so what he wanted to do was develop photography but in a different style to just taking a plain image.
He took it upon him self and took a picture on a film camera of all different peoples faces, once he had captured the images he wanted he took the film to a dark room photography lab and decided to print his images.
This method is called silver-drip photography. For this process, all you have to do is take images on a film camera and then develop them in a dark room studio. Once you have exposed your film onto light sensitive paper, take it over to a developer and only put the developer solution onto a certain bit of the paper to get the effect you want to get.
His work has been shared from thousands of people, all around the world, because he is the one who made silver-drip photography.
Silver-drip photography is also known as selective development within the dark room - These next images are going to be a numerous amount of selected images I have found from typing in 'selective development in the dark room' on google:


Here are some examples of silverdrip photography I did myself in the darkroom, these images where taken with a PENTAX K1000.


C H E M I G R A M S - C A M E R A L E S S P H O T O G R A P H Y
EXAMPLE:

For this example, we did as a class, we used a four different food types, salt and vinegar, mayo, ketchup. When you search, 'What is a Chemigram?" your instant research states that a Chemigram is a type of photography where you create photography on light sensitive paper without the use of an actual camera. Practically all you have to do is find some light sensitive paper and put some kind of substance on it and then develop it in the developer solution for it to create an abstract image.
Photographic paper, as you know is sensitive to light, so once you have exposed the paper to some light and added your substance, once you put your piece of paper in the developer, a chemical reaction will occur, so the area where the plain paper will become exposed leaving an abstract print on your paper; then when you add your paper to the water tray, you strip all of the sensitivity away from the paper so it becomes not sensitive to light.
Photographers use Chemigram's to focus on mixing up photography and trying to work with different chemicals for exposing pieces of light sensitive paper.


These are a closer look into the Chemigram's that we did as a class, you are able to see where we placed our chosen substance on the image, and you are also able to see where the paper was sensitive towards working with the developer.
C L A S S E X A M P L E O F A L U M I N O G R A M : C A M E R A L E S S P H O T O G R A P H Y

Luminogram's are just a little different from photograms, instead of getting the direct light to shine straight onto the piece of paper, you have to get a light of your own (lighter) and go close to the paper around the sides to exposure certain bits to light, this gives it more of a 3D look through out the pictures you choose to do.
D O U B L E E X P O S U R E
Double exposure is just two different images that are lay over one another, its a really good method to collage your images together but in a different way. The best way to get good results is to use black and white film so the colors don't end up contrasting against one another. It makes the metering less intimidate. The best way to see it is if anything on the first exposure is white it will contrast against the second image but if your first exposure is a dark one it will turn out better for the end result.


All of theses images are just double exposed images, where as you can also have a thing called multiple development where you do multiple exposures on the same image to capture a continuous look throughout the whole image.


These are my own versions of double exposures images. I managed to capture these when I was away in Spain, Alicante.


P U S H I N G A N D P U L L I N G F I L M

This is the push and pull chart that was created by thedarkroom.com, they have shown the guide to how many stops there should be to push or pull, its a really good way to check to see which method is recommended to get good results.
If you're wanting to shoot with push or pull you will need to get a camera where you can manually change the ISO, all you need to do is set the speed to a speed of your choice, but this has to be different to the film speed and you would shoot the film as you normally would.
Pushing light is most common to occur in low light situations because the film ISO isn't fast enough to shoot at box speed or shutter speed. It has increased contrast in the lighter areas, Pushing genuinely just increases contrast, puts grain on the image but makes the shadows stay practically the same.
When you are pulling film it decreases the contrast but it makes all of the shadows more detailed. Its more recommend to do the pushing and pulling on black and white film rather than colored film, although you still can do it on colored it is recommended to do it on black and white.


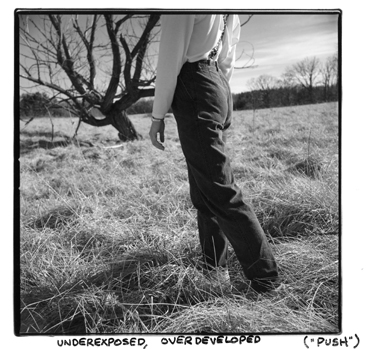
*images found on "afterness.com"*
C L A S S R O O M O B S C U R A : C A M E R A L E S S
P H O T O G R A P H Y


For this workshop, all we had to do was black out the whole room and cut out a section of the black out paper on the window and then the light would shine through the window and print the image onto all of the walls inside the room.

Camera obscura is an ancient method of photography. Camera obscura is also known as "dark chamber photography", this was the easiest method of photography before cameras where invented.
EXAMPLES OF CAMERA OBCURA:


P H O T O G R A M S : C A M E R A L E S S P H O T O G R A P H Y


When you are doing a photo-grams, all you have to do is place an object you would like to get the shadow of onto a piece of light sensitive paper and you would exposure light over the top of the objects for a time of your choice, it is best to experiment with how long you want to expose because if it is exposed to much it could ruin the standard of the image. Photo-grams has been in the photography industry for centuries and will continue to stay in because of the ability of how far you can take your images with photo-grams.
P I N H O L E P H O T O G R A P H Y


Pinhole photography is photography used by a camera, with no lens. It usually comes in the form of a box, with a pin hole in one side, the image from outside the box is printed into the box and this is called the camera obscura method. The box has to be fully light proof other wise this method wouldn't work. To get the pinhole shoot, all you need to do is, go in the dark room and get your pinhole camera and a piece of exposure paper, put your paper in the pinhole camera and close the pinhole. You would go to a location you want to capture, and you would exposure your paper by removing your hand from the pinhole for a short amount of time so it gives your paper time to exposure the image on. You would then go to the darkroom and process your image, the image would turn out to be a negative at the end.
H E A L T H A N D S A F E T Y
Only have authorized people in the darkroom that know what they're doing.
Keep your workplace clean and tidy.
Make sure the wet and dry areas are separated.
Don't mix any chemicals or acids together if you don't know what you're doing.
Wear protective equipment (gloves and goggles, ect...
Make sure everything is labelled.
Do not eat or drink in the dark room.
Do not wash any chemicals down the sink.
Make sure you wash your hands every time you have finished in the dark room.
Keep a spill kit in the dark room.
Comments